


NT2A K47 Professional Studio Condenser Microphone Capsule Mount - Perfect for Podcasting, Voiceovers & Home Recording Studios
Delivery & Return:Free shipping on all orders over $50
Estimated Delivery:7-15 days international
People:11 people viewing this product right now!
Easy Returns:Enjoy hassle-free returns within 30 days!
Payment:Secure checkout
SKU:94310536


Product Description
If you hope to install our RK-47 capsule into the Rode NT2-A, this custom mount will make the job easier.
Compatibility
This capsule mount is designed to fit the Rode NT2-A. It is not known to fit any other microphones, although there is the possibility that it fits other Rode microphones, such as the K2.
The saddle built into this mount fits the RK-47. It is not known to fit third-party c(r)apsules that claim to be "RK-47"s found on Ebay, Alibaba, etc. (And we're not sure why anyone would choose to replace the single most important component in the entire microphone with an inferior, untested, and likely factory-reject capsule anyway.)
We offer a bundle discount on the saddle plus RK-47. See the pulldown "Bundle" menu at the top of this page.
Color
The photos show a black mount, but the color of the parts we ship will vary as we test different production methods.
Installation
- De-solder the front and rear diaphragm wires from the PCB. Leave the backplate wire soldered in place.
- Remove the two screws holding the capsule to the white plastic saddle.
- Remove the styrofoam standoff from the top of the Rode capsule. It is screwed to the backplate; you might need to rotate the standoff assembly (meaning, the plastic base and styrofoam standoff) counter-clockwise to unscrew it, if the screw head is not exposed.
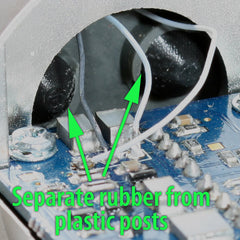 Invert the microphone. Locate the two posts of the white plastic capsule mount. Separate the rubber dome from these two posts. The rubber is glued to the posts; you will risk tearing the rubber if you simply pull the white mount out by force.
(Note: this photo shows the new saddle installed. A stock NT2-A would likely have off-white colored posts.)
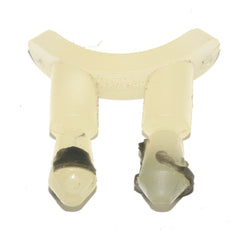 Once the glued areas are separated, pull the white mount from the rubber dome. It is acceptable of small bits of rubber tear off and remain stuck to the capsule mount.
 Using two 6mm x M1.6 metric machine screws (included), mount the RK-47 to the new saddle without touching the diaphragms. Handle the capsule by its edges only. Position the 3rd threaded hole in the RK-47 backplate next to the shorter end of the saddle.
Optional: apply glue to the ends of the two posts, where they contact the rubber dome. We have not tested glues, but assume that white household glue or 2-part epoxy would both work. Some solvent-based glues might dissolve the PLA material in the new capsule mount, so we advise testing a small dab of glue to check for adhesion compatibility problems prior to assembly.
- Press the new mount into the rubber dome.
- Using a very short (2mm) M1.6 metric machine screw, connect the eyelet from the mic's backplate termination wire (which was left soldered in place in step 1) to the exposed hole in the RK-47 backplate. If no exposed hole is available, or the wire does not reach, remove one of the mounting screws (from step 6), thread the screw through the eyelet, and re-install the screw.
- Using a short loop of adhesive tape, attach the styrofoam standoff (with its plastic base) to the top of the RK-47. No screw is necessary or desired here. This piece will press against the inside of the NT2-A headbasket, preventing capsule movement.
- Thread the RK-47's capsule wires through the holes in the rubber dome. Keep track of which is which.
- Reinstall the NT2-A headbasket.
 Solder the RK-47's capsule wires to the Rode PCB as indicated in the photo. Note that if you use too much solder, you risk short-circuiting these three capsule wire connections. If you short-circuit any two of these three pads, the capsule will not work properly.
 Invert the microphone. Locate the two posts of the white plastic capsule mount. Separate the rubber dome from these two posts. The rubber is glued to the posts; you will risk tearing the rubber if you simply pull the white mount out by force.
 Once the glued areas are separated, pull the white mount from the rubber dome. It is acceptable of small bits of rubber tear off and remain stuck to the capsule mount.
 Using two 6mm x M1.6 metric machine screws (included), mount the RK-47 to the new saddle without touching the diaphragms. Handle the capsule by its edges only. Position the 3rd threaded hole in the RK-47 backplate next to the shorter end of the saddle.
 Solder the RK-47's capsule wires to the Rode PCB as indicated in the photo. Note that if you use too much solder, you risk short-circuiting these three capsule wire connections. If you short-circuit any two of these three pads, the capsule will not work properly.
DIY Alternative
If you have access to a precision drilling rig, you can drill two new holes in the stock Rode capsule mount in order to accommodate the RK-47. The holes should be centered in the saddle arms, front to back, and separated by 60 degrees. One or both holes will likely go through the two posts below the saddle (at an angle); you'll need to source sufficiently long M1.6 metric machine screws to reach the capsule through the post.


